If you walk into a bike shop today, you’ll see helmets ranging from $20 to $300. The $300 one looks like a spaceship and claims to be aerodynamic enough to save you 40 seconds over 25 miles. The $20 one looks like a styrofoam cooler with straps.
Here’s the dirty little secret the industry doesn’t scream about: they both have to pass the exact same federal safety standards. That $300 spaceship doesn’t necessarily protect your brain any better than the cooler. In fact, some of the safest helmets on the market right now cost less than a tank of gas.
I’ve crashed in cheap helmets. I’ve crashed in expensive helmets. I’ve seen customers come into the shop holding helmets that were cracked in half, shivering from adrenaline but totally fine. I’ve also seen people riding with their helmet tilted so far back they look like a tourist in a comedy sketch.
You don’t need to spend a fortune to keep your skull intact. But you do need to know which safety ratings to lok for, why “MIPS” isn’t just a marketing buzzword, and how to fit the thing so it doesn’t fly off the moment you hit the pavement.
The Helmet Safety Ratings , Decoding the Stickers
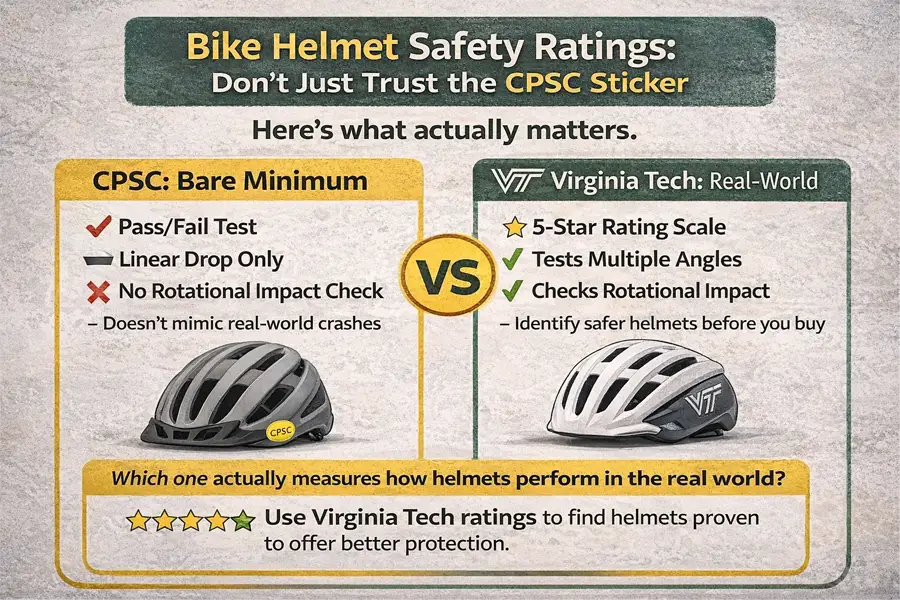
Most people look for the CPSC sticker inside the helmet and call it good. That stands for the Consumer Product Safety Commission, and it’s the mandatory standard for any bicycle helmet sold in the US.
The Problem with CPSC (The “Pass/Fail” Trap) The CPSC test is a pass/fail exam. They put a helmet on a headform and drop it upside down onto a flat steel anvil from about 2 meters high (roughly 14 mph). If the sensor inside the headform registers less than 300g of peak acceleration, the helmet passes.
That’s it. It doesn’t matter if it registered 299g (barely passed) or 100g (incredible protection). Both helmets get the same sticker. It’s like finding out your surgeon “passed” medical school, did they get an A or a D-minus? You don’t know.
Also, the CPSC test uses a linear drop. It simulates you falling straight down onto the top of your head like a lawn dart. How often does that happen? Almost never. When you crash, you hit the ground at an angle. You slide. You roll. This creates rotational force, which the standard CPSC test doesn’t even measure.
The Solution: Virginia Tech Helmet Ratings, if you actually care about your brain, ignore the CPSC sticker (it’s legally required anyway) and look for the Virginia Tech Helmet Ratings.
These guys are the independent auditors of the helmet world. They realized the federal standards were outdated, so they built a better test.
- Real-world impacts: They test at different speeds and angles to simulate what actually happens when a cyclist hits pavement.
- Rotational measurement: They measure how much your head spins inside the helmet during impact (more on why this matters in a second).
- STAR Score: They rate helmets on a 5-star scale based on concussion risk. A 5-star helmet is statistically more likely to prevent a concussion than a 3-star helmet.
Here’s the kicker: There are $50 helmets with 5-star ratings, and there are $250 helmets with 3-star ratings. Price does not equal safety. It equals ventilation, weight, and brand prestige. But concrete doesn’t care how cool your brand logo is.
“Sloshing” Science , Why Rotational Force Kills
Ten years ago, helmet safety was just “put foam between head and rock.” Now it’s all about “rotational impact protection.” Why the shift?
Your brain isn’t bolted to your skull. It’s floating in a bath of cerebrospinal fluid. Think of it like a pickle floating in a jar of brine.
Linear Impact (The Old Thinking): If you drop the pickle jar straight down, the glass might break, but the pickle just bumps against the bottom. This is what traditional helmets protect against, skull fractures.
Rotational Impact (The Reality): If you spin the jar violently, the pickle twists and shears inside the liquid. This is what happens when your helmet grips the pavement and stops instantly, but your head keeps rotating. That rotational force stretches and tears the delicate nerve fibers in your brain (diffuse axonal injury). This is how you get a concussion, or worse.
This is why MIPS (Multi-Directional Impact Protection System) became the industry standard. It’s designed specifically to stop the pickle from spinning.
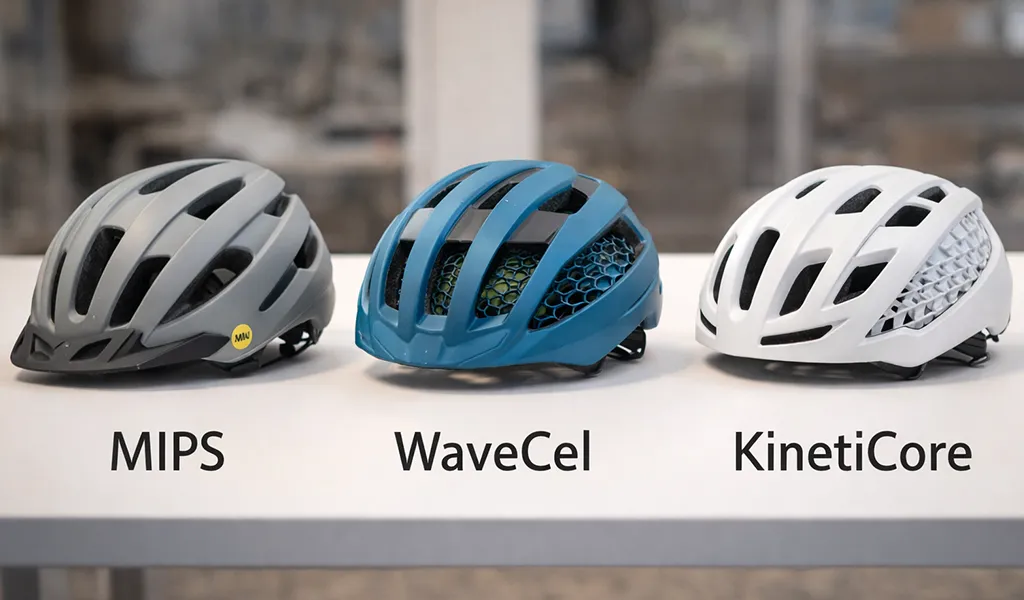
MIPS, WaveCel, and KinetiCore , Decoding the Helmet Alphabet Soup
You’ll see these acronyms plastered all over the helmet boxes. Here’s what they mean to a non-helmet-marketer (normal human being), minus all the buzzwords.
MIPS (Multi-directional Impact Protection System)
The Tech: A thin yellow plastic liner that sits between your head and the helmet’s foam.
The Analogy: It’s a slip ‘n slide for your brain.
How it Works: When you hit the ground at an angle, the helmet grips the pavement. The MIPS liner allows the helmet shell to slide 10-15mm relative to your head. That tiny movement dissipates the rotational energy before it reaches your brain.
The Verdict: Essential. Don’t buy a helmet without it (or a similar tech). It’s standard on almost everything now, even budget lids.
WaveCel
The Tech: A collapsible cellular structure that looks like a bunch of neon green drinking straws glued together in a honeycomb pattern.
The Analogy: A crumple zone, like the front of a Volvo.
How it Works: Upon impact, the cells flex, crumple, and glide to absorb energy. It’s very effective at stopping rotation.
The Verdict: Very safe, usually scores high on Virginia Tech ratings. But, and this is a big but, it blocks airflow like a brick wall. If you ride in hot weather or sweat a lot, your head will feel like a greenhouse.
KinetiCore
The Tech: Lazer’s proprietary answer to MIPS. Instead of adding a plastic layer, they mold “crumple zones” directly into the EPS foam of the helmet itself.
The Analogy: Built-in shock absorbers.
How it Works: The foam blocks deform and break during impact to redirect energy.
The Verdict: Lighter and breathes better than MIPS because there’s no plastic liner blocking the vents. It’s a cleaner solution, but currently only available on Lazer helmets.
Bike Helmet Types , Don’t Bring a Knife to a Gunfight
Not all helmets are created equal. Wearing a skate helmet on a road bike is like wearing combat boots to run a marathon. You can do it, but there is a high chance you’ll feel miserable when you do.
Road Helmets
The Look: Lots of vents, aerodynamic shape, no visor.
The Priority: Ventilation and weight.
Why: When you’re hunched over the handlebars grinding up a hill, you generate a massive amount of heat. Road helmets act like radiators for your head.
Buy if: You ride for fitness, go fast, or live in a hot climate state or country.
Commuter / Urban Helmets
The Look: Rounder shape (bowling ball style), fewer vents, often have built-in lights or reflective paint.
The Priority: Durability and visibility.
Why: These are built to take abuse. You can lock them to your bike or toss them in the office corner without worrying about denting the foam. They sacrifice airflow for toughness.
Buy if: You ride to work, lock your bike outside, or want integrated lights for surviving heavy traffic.
Mountain Bike (MTB) Helmets
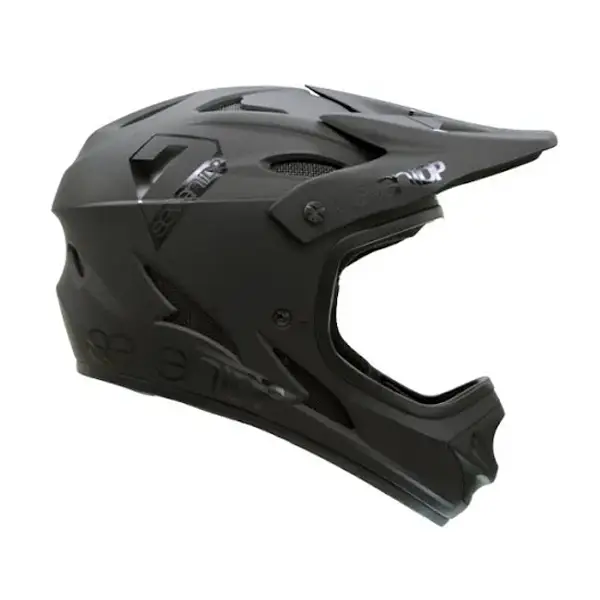
The Look: More coverage on the back of the head, big visor on the front.
The Priority: Protection and sun/branch blocking.
Why: When you crash on a mountain bike, you’re more likely to fall backward or sideways into rocks. The extended rear coverage protects the occipital bone (back of your skull). The visor isn’t for style. It keeps the sun out of your eyes and slaps tree branches away from your face.
Buy if: You ever ride on dirt trails.
Skate / BMX Helmets (The “Bucket”)

The Look: Smooth round shell, tiny vents.
The Priority: Multiple small impacts.
Why: Most skate helmets use a different type of foam (EPP) designed to take multiple small hits from bailing on a halfpipe.
Avoid these for road cycling. They are heavy, hot, and often don’t pass the same high-speed impact tests as cycling-specific helmets unless certified (look for the CPSC sticker).
The Fit Guide , How to Not Look Like a Jerry
You can buy the safest helmet in the world, but if you wear it wrong, it’s just a fancy hat. I see this on the bike path every single day. It’s one of the most common beginner mistakes: wearing helmets perched on the back of their heads, exposing their entire forehead.
1. The “Forehead Test”
Put the helmet on. Place two fingers horizontally above your eyebrows. The front rim of the helmet should touch your fingers. Kudos to NHTSA for this recommendation.
- The Mistake: If you can fit three or four fingers, the helmet is tilted too far back (the “bonnet look”). If you crash, the first thing hitting the pavement is your face, not the helmet.
- The Fix: Pull the helmet forward. Tighten the chin strap.
2. The “Shake Test”
Unbuckle the chin strap. Shake your head like a dog drying off.
- The Mistake: The helmet slides sideways or falls over your eyes.
- The Fix: Tighten the retention dial in the back (the little clicky wheel). It should grip your head firmly enough to stay put without the strap. If it’s maxed out and still loose, you need a smaller size.
3. The “V” Straps
Look at your ears in the mirror. The side straps should form a clean “V” shape right under your earlobes.
- The Mistake: The plastic slider is down by your jaw, allowing the helmet to rock back and forth.
- The Fix: Slide the adjusters up until they sit just below your ears.
4. The Chin Strap
You should be able to fit one or two fingers between the strap and your chin.
- The Mistake: It’s hanging loose like a necklace. In a crash, the helmet will rotate back and strangle you or fly off completely.
- The Fix: Tighten it until you feel the helmet pull down slightly when you open your mouth wide.
The “Round Fit” Problem , Why Your Helmet Gives You a Headache
If you’ve ever put on a helmet and felt like your head was being crushed in a vice on the sides, while there was huge gaps at the front and back, you have a Round Head Shape.
Most helmets sold in the US and Europe are “Intermediate Oval”, designed for heads that are longer front-to-back than they are side-to-side. But a huge chunk of the population (especially those of Asian descent) doesn’t always match this design. Myself I’m the other way around I got an idiotic pear shaped head, so I’m in the minority finding a perfectly fitting helmet.
Putting a round head in an oval helmet creates pressure points at the temples. It’s torture after 30 minutes.
The Solution: “Asian Fit” / Round Fit Some brands make specific molds for this.
- Specialized: Look for their “Round Fit” models.
- Giro: They offer “Asian Fit” in select models (often hard to find in the US, but online retailers have them).
- Kask: Their “Mojito” helmet is famous for fitting rounder heads comfortably even without a specific designation.
- Bontrager/Trek: They have specific “Round Fit” versions of their Starvos and Circuit helmets.
If you constantly get headaches while riding, your helmet isn’t too small, it’s the wrong shape. Don’t just size up (then it’s loose front-to-back); find a brand that fits round heads.
Tobias Helmet Recommendations , The “I Like My Brain” Shortlist
Here’s what I’d actually spend my own money on, and me when I say I do not part with my cash willingly. I’m ignoring the $300 aero-grade super lightweight superman invincible “marketing” helmets because if you’re here reading this, you probably aren’t lining up to racing the Tour de France.
The Budget Champion , Specialized Align II MIPS
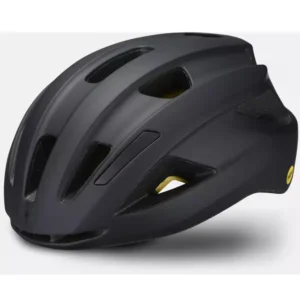
This is the helmet I tell everyone to buy. It costs about the same as a round of drinks, looks decent, and has a 5-star safety rating from Virginia Tech. It protects your brain just as well as helmets that cost four times as much.
The upside:
5-star safety, MIPS included, looks like a normal helmet, cheap enough that you won’t cry if you drop it.
The downside:
“It’s a bit heavy. The ventilation is okay but not amazing. It looks a little “bulbous” (the dreaded mushroom head effect) on some people.
Who it’s for:
Commuters, casual riders, anyone who wants maximum safety per dollar.
The “I Sweat A Lot” Option , Giro Register MIPS
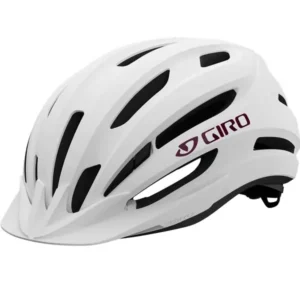
Giro makes helmets that fit 90% of heads perfectly. The Register is their “universal fit” model, which usually means “fits nobody,” but in this case, the adjustment dial is surprisingly good. It has significantly better airflow than the Specialized.
The upside:
Great ventilation, comes with a visor (useful for sun/rain), MIPS included.
The downside:
“Universal fit” size (One Size Fits Most) might feel huge if you have a small head. The straps feel a bit cheaper than their premium models.
Who it’s for:
Riders in hot climates, people who want a visor.
The “I Want to Look Fast” Option , Lazer Tonic KinetiCore
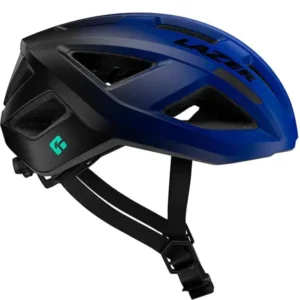
If you don’t want the commuter look, this is a great entry-level road helmet. It uses Lazer’s KinetiCore instead of MIPS, which makes it lighter and airier. It doesn’t look like a bowling ball on your head.
The upside:
Lightweight, looks pro, 5-star safety rating, no yellow plastic MIPS layer to catch your hair.
The downside:
No visor. The eyewear docking slots (where you stick your sunglasses) can be a bit fiddly to use while riding.
Who it’s for:
Road cyclists, fitness riders, people who care about aesthetics.
The Premium Commuter , Bern Major MIPS
Bern made the “skate style” helmet famous for cyclists, but their old models were heavy and hot. The Major is their modern take. It still looks cool (less sporty, more urban), but it actually vents well and has MIPS.
The upside:
Doesn’t look like a bike helmet. Very comfortable pad set. Integrated light mount..
The downside:
Expensive compared to the others. Heavier than a road helmet.
Who it’s for:
City riders who wear normal clothes and don’t want to look like they’re training for a race.
When Should You Replace Your Helmet? , Helmet Expiration Date
One and Done (The Crash Rule) Bike helmets are single-use items. Unlike a football helmet or a multi-impact skate helmet which is designed to take hit after hit, a bike helmet sacrifices itself to save you. The EPS foam crushes to absorb the impact energy. It does not bounce back.
- The Rule: If you hit your head, the helmet is trash. Even if it looks fine on the outside, the internal foam might be compressed. Cut the straps so nobody pulls it out of the dumpster and uses it, and buy a new one. Some brands (like Giro and Specialized) offer a crash replacement discount if you send them the old one.
The Five-Year Rule (The Age Rule) Even if you never crash (look at you, humblebrag), the foam degrades over time. UV light, sweat, hair products, and the temperature swings of your garage all break down the EPS foam. It becomes brittle.
- The Rule: Replace your helmet every 3-5 years. Is this partly to sell more helmets? Probably. But do you want to bet your cognitive function on 7-year-old styrofoam that’s been baking in your trunk? I don’t.
- Check the Date: Look for a sticker inside the helmet. It will have a manufacture date. If you’re buying a helmet on clearance, check this date. Don’t buy “new old stock” that’s already 4 years old.
How to Not Screw This Up , Practical Bike Helmet Tips
1. Measure your head. Get a fabric tape measure (or a piece of string and a ruler). Measure the circumference of your head about an inch above your eyebrows. Most adult heads are between 54cm and 61cm.
- Why: Sizes vary by brand. A “Medium” Giro fits differently than a “Medium” Bell. Buying based on “S/M/L” without measuring is gambling.
2. Don’t buy used helmets. Just don’t. You don’t know if the previous owner dropped it, crashed it, or stored it in a hot car for three summers. A used helmet is a mystery box where the prize is a potential brain injury.
3. Try it on with your cycling cap/glasses. If you ride with sunglasses (you should, bugs in eyes at 20mph sucks), bring them when you try on helmets. Some helmets interfere with the arms of your glasses, pushing them down onto your nose. It’s annoying at mile 1 and excruciating at mile 20.
4. Check the return policy. Helmet fit is personal. A helmet might feel great in the store but give you a hot spot after 45 minutes of riding. Buy from a shop (or site) that lets you return it if it hurts.
Choosing the Right Helmet , Quick Recap
You don’t need the carbon-fiber, wind-tunnel-tested, $300 super-helmet. Unless you are being paid to ride a bike, that marginal gain in aerodynamics is pretty much meaningless.
You want a helmet that:
- Has a 5-Star Virginia Tech rating.
- Has MIPS (or equivalent) rotational protection.
- Fits your specific head shape.
- Is comfortable enough that you won’t hate wearing it.
The Specialized Align II is the pragmatic choice. It’s boring, it’s safe, and it’s cheap. If you want better ventilation or cooler looks, spend a bit more on the Giro or Lazer.
But whatever you buy, actually wear the damn thing. And wear it like it was built to be used. Your forehead is part of your head, try to keep it covered.
Found this useful? Share it with a fellow rider.
🚲 Get LaneSpotter in Your Inbox
Weekly riding tips, gear deals, and no-BS reviews. No spam, unsubscribe anytime.
Join 500+ riders who skip the marketing fluff
Leave a Reply to spaceman 8 Cancel reply